Friday, December 4, 2015

One Sold, One Purchased

I was able to sell my Honda CB1100F and it went to a good home.  After looking at several single cylinder "thumpers", I decided to go with a 1978 Yamaha SR500.  My rationale was:

1) It's a simple bike to work on
2) It's fun to ride
3) It has more power and tuning capability than the new Yamaha SR400
4) It cost a lot less than a 2015 SR500 or a Royal Enfield for that matter
4) I won't feel bad about doing some mild customization on a used bike
5) The SR500 I found had some nice modifications already completed, like wire wheels, extra oil feed line to the head, drilled rotor


So, I've added a non-Honda to the collection...


Since this is a Honda SL90 blog, I will return to the regularly scheduled program of SL90's.
I may pop in some photos of the SR500 as I modify it (either that or start a new blog)

Update: I made some minor modifications.


Saturday, November 7, 2015

CB1100F

I've spent the last month tuning and riding my 1983 CB1100F.  I've go it ready to sell and I'm posting it to Craigslist.  The bike is running CR racing carbs and an RC (Russ Collins) "4 into 1" exhaust.  It's a fast bike and in excellent condition.  But, I'm getting to the age where I need to slow down and I'm rapidly becoming a fan of the smaller bikes - 500cc thumpers are more my speed now.

Here's my CB1100F in all its glory:


Thursday, September 3, 2015

Progress (Red SL90)


Here's the latest on what I have left to complete to finish my red SL90:

                                                       Replace the stator
                                                       Install the drive chain and drive sprocket cover
                                                       Finish connecting all wiring
                                                       Recover and install new seat
                                                       Add "Honda" logo to new seat
                                                       Stripe the gas tank
                                                       Replace faded reflectors
                                                       Shorten the throttle cable
                                                       Adjust the brakes
             
Oh, and while I'm at it,  I should register the bike and get its license plate...

Here's what the little red bike looks like (next to old blue):


It will look a lot better with the silver stripes and new seat.  I plan on using the "temporary" seat that's on the red SL90 for my "bits and pieces" bike.  

Thursday, August 20, 2015

More Bits & Pieces

There has not been a lot of activity on the projects over the last few weeks.  I installed new carburetor gaskets on the red SL90, repaired the red SL90's coil wire and replaced some non-original nuts and bolts on the red bike with Honda OEM parts.  I also installed the ignition switch.  I will need to replace the stator as the wires are not looking good where they connect through the engine case.  Fortunately, I have a spare.  It's too hot to work in the garage, so the stator replacement will need to wait for a morning when I have the time. 

I have managed to complete some small stuff on my "bits & pieces" project bike.  I fixed the kick stand by cutting off the bolt attachment point, reversing it and having welded back together.  Worked like a charm - no need to lean the bike against a wall anymore.  Also, I stripped the foot pegs off of an old CT90 foot peg mount I had in my parts pile.  I also had the rubber peg covers.  These installed nicely and saved me some money, but I found that the foot peg mounting point on the right side is bent slightly from an ancient collision with a rock or tree stump.  I think I can ease it back into position with a little heat and some pressure.


Next, I intstalled the rear brake pedal assembly from one of the spares I had lying around,  I wanted to be sure I had all of the parts, and, sure enough, I did.  The brake pedal is one of the bent ones, but it is not too bad and it works.


I started pricing SL100 speedometers and brackets to fit the SL100 top tree (triple tree bridge) that I am using.  They are way too expensive for a cheap build.  So, I invested $15.00 in the universal headlight brackets you see for sale everywhere.  By using these brackets, I could use the spare headlight bucket I had, plus the old speedometer and headlight.  This saved me some bucks - all I need to do is replace the speedometer rubber. The headlight bucket mounts up fine with spacers.  I will add the stock retaining rings to make sure the brackets won't slide down due to vibration.


While searching my parts pile, I found a set of grips that I purchased for $3.00 way back in the past.  I installed these along with a cheap Emgo throttle and controls.  So, now I have pretty much all of the basics.  I haven't made up my mind about a seat and rear fender.  Fortunately, I have options and I could always use my spare stock seat and fender.  It's nice to be able to assemble a bike and not have to worry about originality.  It was a pain trying to round up OEM and NOS parts for the Blue SL90 and the Red Sl90.  Being able to use old parts from my past projects and spares, plus cheap non-stock items is fun.

I'm pretty sure I can get some steel top mounts fabricated to do a Lifan 125cc engine installation on this bike.  I saw a fairly new Lifan (low miles) go for $65.00 on Craigslist - too bad I missed it,  Even if it had some problems, it would make a great engine for mocking up the mounts.

Monday, July 27, 2015

Bits and Pieces


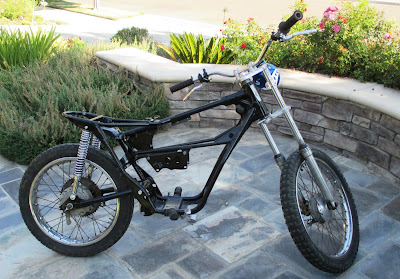
Well, no offers came in on the black frame, so I've added some bits and pieces to it.  My idea is to build another bike using my spare parts.  I had some SL100 parts in the bin and since the top bridge of my last SL90 triple tree was cracked, I replaced it with an SL100 top bridge.  The SL100 triple tree top bridge interchanges with the SL90 (it fits!), but the SL100 bridge has mounts for a speedometer.  No worries, I had what looks like a set of SL100 fork covers, complete with a headlight bucket in the parts bin, so I installed them on the SL100.  I also added the spare rear fender I had as well.  After looking through my parts, I also decided to install the low sport handlebars.  I'm starting to think this might make a neat little street tracker project (maybe?).   At any rate, the idea is to build it with as few new/replacement parts as possible, thus cleaning out my garage.  Here's what it looks like with the handlebars, fork covers, headlight bucket and rear fender:


I did make a frustrating discovery when I attempted to install the kickstand (side stand).  The spare kickstand that I had must have been broken sometime in the past and repaired by welding.  The mounting point (loop) is backwards.   If you mount the kickstand, it will not work (unless you mount it backwards).   So, I will have to cut and weld the mounting point back on in the proper position - drat!!   Here's the kick stand - it's backwards...


Thursday, July 16, 2015

Update - Another SL90 Project ??

I've pretty much finished the red SL90 - all I need to do is stripe the gas tank and line it.  I have a few other small tweaks to make.  Once it's striped and tweaked I'll post the updated photos.

In the meantime, I have a pile of "left-over" parts - almost enough to make a third SL90.  I decided to bolt together the basics and see if I could sell a "roller".  No luck, so far.  So I'm thinking of another project bike, but this project will not be a restoration.  What I may do is use all of my left-overs to make a complete bike, but not pay attention to details like paint color, orginal parts and so on.  In fact, I'm thinking of using a 125cc Lifan engine and fabbing up brackets to mount it in the frame without hacking it up.  Or, I could just part out everything on Ebay.

Stay tuned...


Monday, January 19, 2015

!!!??** Frozen Intake Studs!!!!!??!!***

Well, I got the wiring harness set up and decided to install the intake and carburetor.  I wanted to see if I could get the engine to start. However, I found that I could not install the intake because the mounting studs were slightly bent, just enough that I could not install the intake.  Also, upon closer inspection, I noted that the threads on one stud were chewed up a bit as well.  I had not noticed that the studs were bent (it wasn't obvious).  I should have checked before installing the engine (note to self).   


I tried using two nuts on the studs to remove them, but I found that they were frozen and stuck tightly to the head.  I ended up pulling the engine out of the red bike so I could work on removing the studs.  First I tried vice-grips, but the studs would not budge.  So, here's what I did:  1) soaked the studs in PB Blaster overnight; 2) heated the studs and head (were the studs are threaded in) with a torch until they were nice and hot; 3) cooled the studs and the head down (froze them) with compressed air (canned air upside down); 4) put on the vice grips and tapped the handle with a ball peen hammer to back off the studs slowly and Voila! The frozen studs came right out.  Whew, given how tightly the studs were in, I thought I'd end up welding nuts to them to get them out.


Here are the bent studs (above).  Note the chewed up threads (partly vice grip damage).


I happened to have two new studs in my parts supply.  I figured I need them for intake or exhaust problems sometime in the future.  Here they are freshly installed with anti-seize. 


Now the intake pipe drops right in place (above).  With the engine out, I might as well pull the head and inspect the condition of the valves and piston - also, I want to replace the cases with refinished cases (plus clean-up the fins).   Eventually, I'll install the ported head and new cam, plus bore out the cylinder and install a new piston and rings.